2010년 5월 13일 목요일

Prevent Changing the Screen Saver and Wallpaper in Windows 7


Sometimes you might not want users to have the ability to change Screen Savers and Wallpaper on Windows 7 workstations. Today we look at how to prevent them from changing either one or both.

You might administer computers in your home or small office and find it annoying when users continuously change the wallpaper and Screen Savers to something obnoxious. A lot of times they might be inexperienced users and download these so-called “wonderful and free” Screen Saver/Wallpaper packages from shady sites that include loads of Spyware. Preventing users from changing them is another helpful tool to avoid wasteful time spent switching things back.

Prevent Changing Screensavers & Wallpaper Using Group Policy Editor

Note: This method uses Group Policy which is not available in Home versions on Windows 7.

Open the Start Menu and enter gpedit.msc into the Search box and hit Enter.

gpedit_start

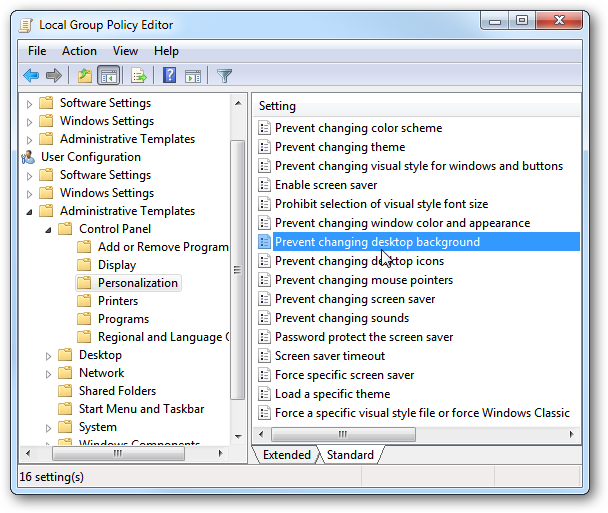
When Local Group Policy Editor opens, navigate to User Configuration \ Administrative Templates \ Control Panel \ Personalization. Then in the right column double-click on Prevent changing desktop background.
1wallpaper

Now check the radio button next to Enabled, then click OK.

2wallpaper

Back on the Group Policy Screen, double-click on Prevent changing screen saver.

4walls

In the next screen select the radio button next to Enable, click OK, then close out of Group Policy Editor.

5walls

Now when a user goes into the Personalization section, the Desktop Background hyperlink is now grayed out and inactive. Notice the message One or more of the settings on this page has been disabled by the system administrator at the bottom of the section.

3wallpaper

If they click to change the Screen Saver, an error message will pop up letting them know the function is disabled.

6saves

Prevent Changing Screensavers & Wallpaper Using a Registry Hack

You can also make a couple Registry changes to prevent users from changing the Wallpaper & Screen Saver…which will work on Home versions of Windows 7. Before making any Registry changes make sure you back it up first.

Open the Registry by typing regedit into the Search box in the Start menu and hit Enter.

regedit_Start

First we’ll start with the Wallpaper. Navigate to HKEY_CURRENT_USER\Software\Microsoft\Windows\CurrentVersion\Policies\System and create a new String Value and name it Wallpaper.

20wall

Then modify the Value data to point to the location of the Wallpaper you want it to always be. Where in this example it’s our main wallpaper on our local drive…then click OK.

25wall

Now let’s make sure they can’t change the Screen Saver. In the same Registry location, we need to make a new DWORD (32-bit) Value.

27wall

Give it the Value name of NoDispScrSavPage and the value data of “1” and click OK.

28scn

Close out of the Registry and restart the machine or simply log off then back on again for the changes to take effect.

Results

For the Wallpapers, a user can still go in and see the selections, however if they try to change it to something else…

22wall

It will just go back to the Personalization screen and no changes will be made, as we set the value to only be the background we specified.

23wall

If the user tries to make a change to the Screen Saver, the hyperlink will be grayed out and inactive, and the message One or more of the settings on this page has been disabled by the system administrator will be displayed at the bottom of the section.

30srn

Conclusion

If you’re tired of users changing the Wallpaper and Screen Saver, and want another way to help avoid Malware, locking down these settings can help a lot. Again, before making any changes to the Registry, make sure to back it up. These settings should work in Vista and XP as well.

How to Disable Access to the Registry in Windows 7

If you don’t know what you’re doing in the Registry, you can mess up your computer pretty good. Today we show you how to prevent users from accessing the Registry and making any changes to it.

Using Local Group Policy Editor

Note: This method uses Group Policy Editor which is not available in Home versions of Windows.

First type gpedit.msc into the Search box in the Start menu.

gpedit_start

When Group Policy Editor opens, navigate to User Configuration \ Administrative Templates then select System. Under Setting in the right panel double-click on Prevent access to registry editing tools.

1reg

Select the radio button next to Enabled, click OK, then close out of Group Policy Editor.

2reg

Now if a user tries to access the Registry…

regedit_Start

They will get the following message advising they cannot access it.

3reg

Using Registry Enabler & Disabler 3

If you’re using Home or Starter version of Windows 7, you can use a neat utility called Registry Enabler & Disabler (link below). This app works on XP and Vista as well.

4reg

There is no installation involved so you can run it from a flash drive, disable the registry, then take the flash drive with you while a the user is on the machine.

5reg

Again, if the user tries to access the Registry they will get the following error…

3reg

Using one of these options will stop users from gaining access to the Registry or running any registry hacks. Of course if you have a shared computer, you may want to set up other users with a Standard Account, as they won’t be able to make changes to the Registry anyway.

Download Registry Enabler & Disabler 3

윈도우7에서 프로그램을 호환성 모드로 시작하기


출처: How-To Geek Using Program Compatibility Mode in Windows 7

Program Compatibility Assistant

Program Compatibility is a mode that allows you to run programs that were written for earlier versions of Windows. The Program Compatibility Assistant detects compatibility issues and allows you to reinstall using the recommended settings.

2comp

After we closed out of the error, the Program Compatibility Assistant came up advising that the program didn’t install correctly. To try to install it again, select Reinstall using recommended settings.

3comp

The Compatibility Assistant went through and fixed the issue and we were able to install the driver. The problem was the driver was designed for Vista and the the assistant automatically select the correct compatibility mode for us to install it.

4comp

Sometimes you might get a screen similar to this example where Virtual PC 2007 isn’t compatible with Windows 7 and you can check for solutions online.

18comp

After checking for solutions online, we’re shown that there is an update that might solve the issue.

20comp

Which points us to the Microsoft site to download Virtual PC 2007 SP1.

21comp

Note: If you’re an Admin and tired of seeing it pop up because you know what you’re doing, check out our article on how to disable program compatibility assistant in Windows 7 and Vista.

6comp

Program Compatibility Troubleshooter

There might be times when Program Compatibility Assistant can’t find a solution, or a program installs fine, but doesn’t work the way it should. In that case you’ll need to troubleshoot the issue. Right-click on the program icon from the Start Menu or in many programs the shortcut icon and select Troubleshoot compatibility.

7comp

Windows will detect any issues with the program and you can try to run it with the recommended settings, or go through the troubleshooting wizard. For this part of our example we’ll select Try recommended settings.

8comp

This option allows us to test run the program to see if the new compatibility settings fix the issue. Click on Start the program to begin testing it out. After testing the program and determining if the settings work or not click on Next.

9comp

If the program is running correctly you can save the settings and it will continue to run with those settings. If it didn’t work properly, you can try using different settings or report the problem to Microsoft and check for an online solution.

10comp

If you selected No, try again using different settings it will bring up the troubleshooter where you can specify the issues you’re having with the program.

11comp

Depending what you check in the screen above, you’ll be presented with other options for what is not working correctly. Where in this example it shows different display problems.

12comp

New settings are applied to the program and you can try running it again.

13comp

If none of the compatibility settings work for the program, you’re prompted to to send a generated problem report to Microsoft.

14comp

Manually Select Compatibility

Of course if you don’t want to deal with the Program Compatibility troubleshooter, you can go in and manually select Compatibility Mode. Right-click the program icon and select Properties.

16comp

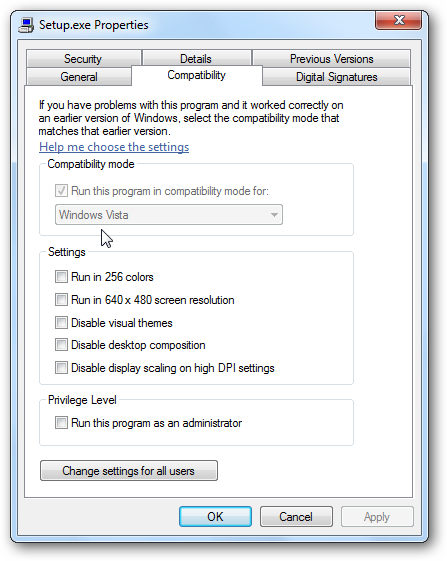
Then click the Compatibility tab then check the box Run this program in compatibility for and select the version of Windows from the dropdown. Now it will always run the program in Compatibility Mode for the version of Windows you selected.

17comp

Use Your Favorite Wallpapers in Windows 7 Starter Edition

If you have Windows 7 Starter Edition installed on your netbook, the default wallpaper can get old. If you are tired of looking at the default wallpaper, then join us today as we look at changing it with Oceanis Change Background Windows 7.

Special Notes

This information is quoted directly from the website and needs to be kept in mind when using Oceanis Change Background Windows 7:

  • If the Oceanis Change Background Windows 7 program no longer works properly after installing some Windows Updates, then uninstall and reinstall the Oceanis Change Background Windows 7 program to have it run properly again.
  • If you ever do an in-place upgrade to another higher level edition of Windows 7 in the future, then be sure to uninstall this Oceanis Change Background Windows 7 program first to avoid incompatibility issues with it in the new edition of Windows 7. It was designed to only work in Windows 7 Starter edition.

Before

There it is…the default wallpaper everyone with the Starter Edition gets stuck with. Some people may not mind it, but if you are one of the people who really wants something different then get ready to rejoice.

oceanis-01

After

The install file for Oceanis is contained in a zip file so you will need to unzip it to get started. The install process is quick and simple but you will need to do a system restart afterwards. Once you have restarted your computer this is what your screen will look like…do not panic and think that this is all there is to it. This is just the Starter Screen and can be easily changed…

Note: Oceanis will auto-start with Windows each time.

oceanis-02

Using either the Desktop Icon or the Start Menu Entry, open up the Oceanis Main Window. You will see the set of four default wallpapers shown here.

oceanis-03

At this point the best thing to do is browse for the appropriate folder where you have all of those wonderful new wallpapers just waiting to be used.

Note: We found Stretch to be the best Picture Position setting on our system.

oceanis-04

For our example we had three ready and waiting. We decided to try out the Wallpaper Slideshow feature first.

oceanis-05

We chose a time frame and saved our changes.

oceanis-06

Here are our three wallpapers as they switched through. This can be much more interesting than the default wallpaper.

oceanis-07

oceanis-08

oceanis-09

There was only one quirk that we encountered while using the Slideshow Setting. On occasion if we minimized a non-maximized window there would be a leftover partial image in place of the window. Our suggestion? Go with one wallpaper at a time and the settings shown below.

oceanis-10

These are the settings that we had terrific luck with…Only one picture selected, Picture Position = Stretch, & Change Picture Every = Every Day. Using these settings, the Starter Edition acted just like any of the other editions with regard to wallpaper management.

oceanis-11

Conclusion

If you have grown tired of looking at the default wallpaper in Windows 7 Starter Edition then you will certainly appreciate what Oceanis Change Background Windows 7 can do to fix that problem.

For more ways to customize your Windows 7 Started Edition, be sure to to check out how to personalize Windows 7 Starter.

Links

Download Oceanis Change Background Windows 7

이 블로그 검색

팔로어

블로그 보관함